|
Advertisement / Annons: |
My astronomy project:
|
Contents:
Note: |
1, Introduction, resolution and under sampling:When you setup your astronomy equipment for photography there are many things to plan for. One of them is to have a correct size of the pixels in the camera that match the telescopes resolution. Maybe you have more than one telescope that you want to attach your camera to, whatever how you do it it will not be perfect. Lets take a look at the problem. Theoretical resolution:I take my own equipment as an example. First I will tell that my equipment is designed to have both a wide field and a high resolution. It consist mainly of:
I have an Excel sheet where I have put in my data to get the field of view and the theoretical resolution out from it. To simulate a 'one color sensor' (ocs) set the binning =2. 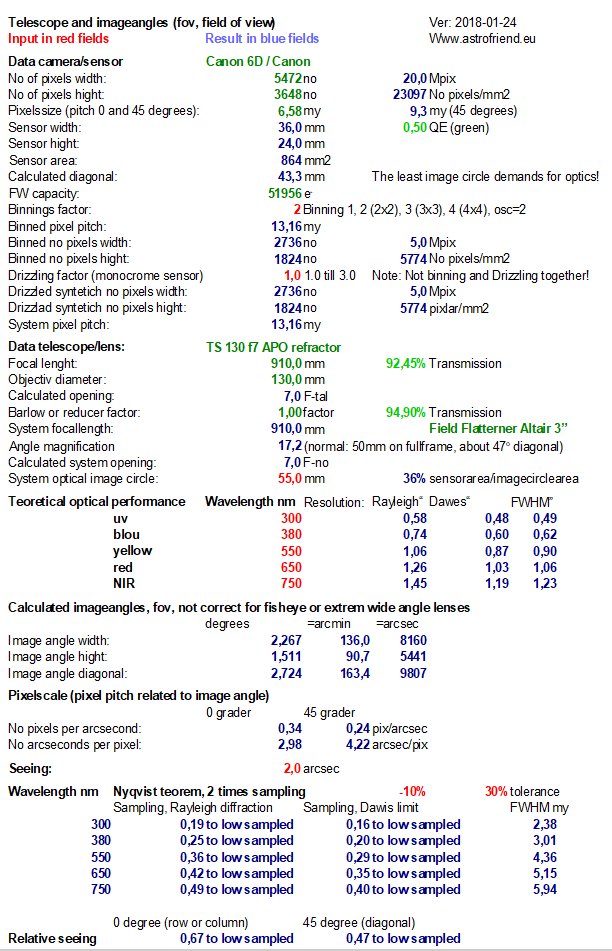
Its image circle with the big 3" field flattener is something like 55 mm. That cover one of the smaller medium format sensor. But already with the full frame camera it has a fov 2.2 x 1.5 degrees, almost that Andromeda galaxy fit in that field. With a medium format sensor it will. Here are my spread sheets if you find them useful: More, the theoretical resolution is also calculated. The FWHM range from blue 0.62" to red 1.06", see, already here is a problem, needs different size (or picth) of the pixels dependent of which wave length it shall detect. " = arc second, 1/3600 of one degree. In reality you never come close to this theoretical resolution with deep sky object because of the long exposure time they need. It's the seeing and guiding error that cause that problem. For planetary photo it's different with its short exposures that freeze the seeing. What sets the resolution limit is normally the seeing, In the table above I have set it to 2", but I never come that low, when it's at best maybe 4". I take balcony astrophotos but design it for better seeing. The sampling is set to 2x according to Nyqvist theorem, that means that a pixel shall cover 2"/2=1". This camera's pixel size is 6.58 my and cover 1.49". The pixel size should have been 30% smaller. But this is a color camera, the pixel scale is twice because the distance between two red or two blue pixels is twice, gives pixel scale of 2.98", or two green pixels gives pixel scale of 2.1" (they are twice as many and the shortest distance is the diagonal). At the bottom row is the sampling relative the seeing, it's only 0.67 instead of two. To sum up, our pixel scale is 3" and we need 1", that is that the camera undersample the optics (or seeing in this case) with a factor of three. We need to shrink the pixel to 1/3. But instead of buying a new camera which cost a lot of money or add a 3x Barlow that shrink the fov (field of view) by a factor of three there are other alternative. There are techniques where you supersample your images, a technique called Drizzle or Superresolution. In Hubble telescope's early time they develop something they called Drizzle. That is a technique to shrink the pixel size by mathematic. What you need is many sub images that have been moved some pixel between each, Dithering technique. You can read more about Drizzle here: Setup a 3x Drizzle:With this I now know that I need to do a 3x Drizzle to get a reasonable pixel match to the resolution. 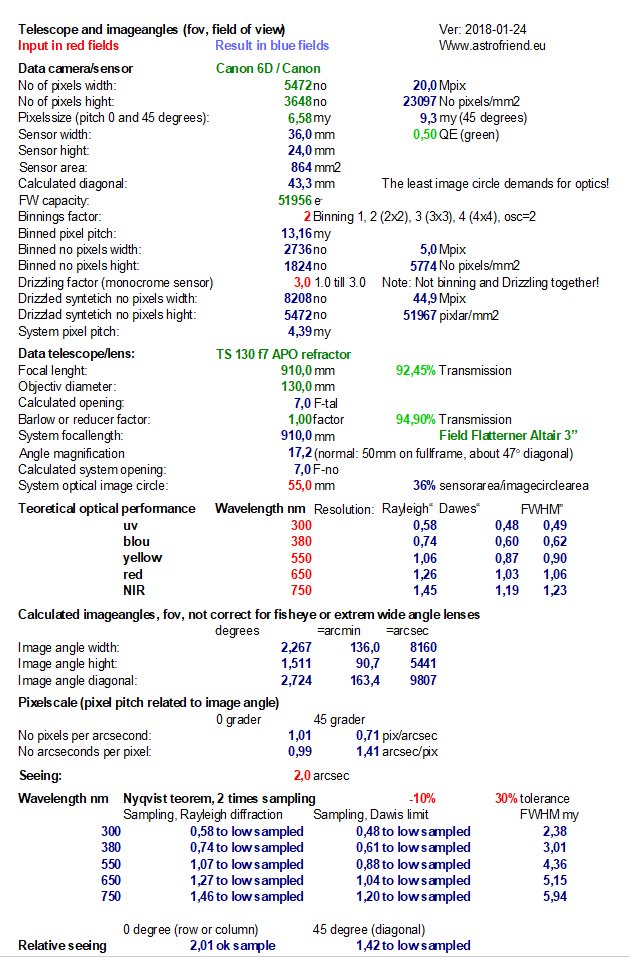
The spread sheet now setup with a 3x Drizzle. Read at the bottom row, now it's perfect, sample is = 2. That relate to the red and blue pixels, for the green a bit oversampled. For the theoretical resolution it's still undersampled. I know this many years ago, but never got it to work very well. I could never see any difference. But now it has changed with more power full computers and new software that handle Windows 64 bit OS.
|
|