|
Advertisement / Annons: |
My astronomy project:
|
Content:
Note: |
Page I.9: First outdoor testGot quite clear weather tonight. Out with the telescope on the balcony, it takes about 10 minutes. Then it takes one hour to calibrate the position and adjust the focus, but it goes faster and faster. The telescope needs one hour before it is thermally stabilized to the outside temperature, so can not get going so much faster if you do not allow the telescope to remain on the mount outside. M106 is at the east so that will be my evening's experimental object. But I can not expose more than 30 seconds at ISO800 and a f5 systems. More than that and I only have strong light pollution on the image. 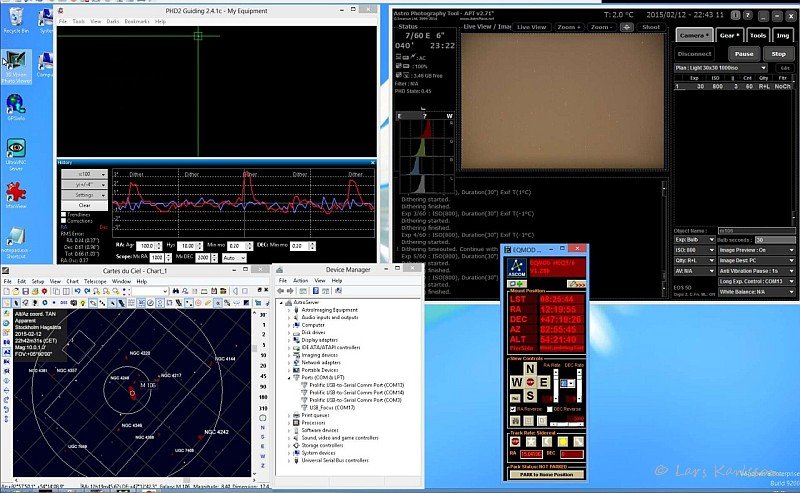
Here how it looks at the astro server screen. Device panel is up there so I can ensure that all USB devices remained at the same com port address. Imagine how good it would be if one could give an uniquely name to every device. Focus control has its own name, the other not. Guess it is permanently embedded in the driver's hardware. Do not in any case found a way to change the name of the other. CdC (star chart program also called Skychart) shows how the camera's field of view is, and make it easy to center the camera on the object. The small box corresponding the guide cameras field of view. Here is how PHD2 (auto guide program) has locked onto a star (green cross) to guide. The guide camera is connected through an off-axis adapter and have relatively large field of view so it is quite easy to find a guide star. The flat field corrector is quite generous as it offers good brightness to the off-axis adapter corner. The main telescope in this setup has 680mm in focal length and that there is a full frame camera, which means that there are many bright stars available in the large field. If I have had an SCT with 2000mm focal length and a small CCD camera sensor it would have been much more difficult, I'm really impressed by you who handling such a system photographically. This star has magnitude 5 so it give the camera plenty of photons. I have tried down to magnitude 8 and it has gone well. The graph shows how the PHD2 gives a dither commando after each exposure. Unfortunately, it is quite easy to hit the the camera so that it is out of focus relative the main camera. Would be good with a motor focus on it too, but may be possible to solve with some sort of mechanical position locking of the off-axis adapter. The focus will of course only have to be done once otherwise when you change the system. EQMOD control the EQ6 mount, 1 point calibration. Polar aligned quite carefully made earlier by operating align assisted by the guide camera and PHD2, within a few minutes of arc. APT control camera focus and syncs with PHD2 so that dithering will be at the right time. APT is so advanced that it can handle multiple cameras with different exposure and sync for the best time efficiency. Maybe I can run two cameras in the future with two telescopes on the same mount, 680mm and 150mm. This applies of course to take advantage of the few clear nights I get in a year. Dithering movement is a bit too small for the pixel scale of this system, at least 5 seconds of arc would be good. But large movements also provide longer stabilization times so there is a bit of a compromise. The camera is controlled by a 3 second delay for the mirror to stop vibrate. You have probably seen this exciting movie of what happens inside a DSLR when you expose? See especially how the mirror shakes! Canon 7D shakeIt's very satisfying when you can do a test after all this work. Much remains, but the justification increases with little practicing on the sky objects from time to time.
|
|